Posted on 1 Comment

How to use your childbirth timeline banner?

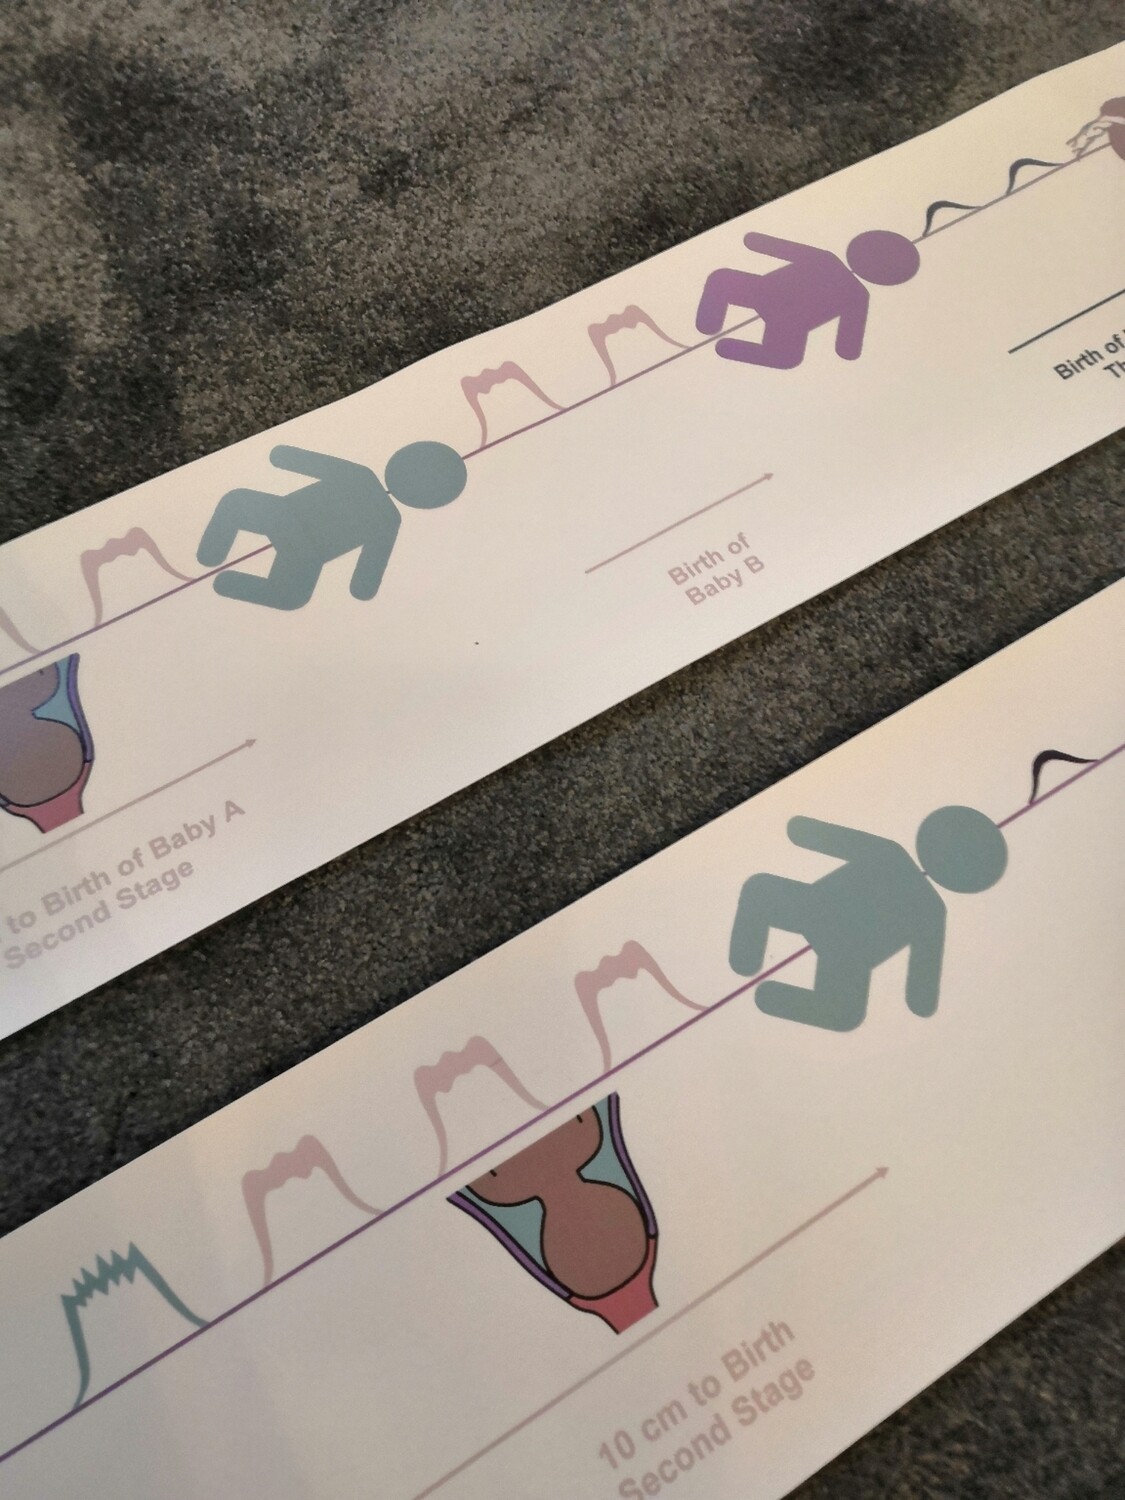
How to use your childbirth/labour timeline banner?

Here are 11 ideas 💡on how to use your childbirth timeline banner (or beadlines).

How to use your childbirth/labour timeline banner?

If you are working in a group setting, I recommend you use the large childbirth/labour timeline banner and for 1:1 work, I recommend the smaller ones and/or beadlines. You can use and adapt any of the activities below to suit a group or 1:1 setting as well as work with the labour/childbirth timeline banners and or beadlines.

To explore how childbirth might unfold

In a group or one-to-one setting or a 1:1 reveal the timeline bit by bit. Starting at the beginning of the birthing journey. You may wish to point out which changes take place internally. How the cervix softens & dilates and how the baby moves. A great visual add-on for this activity are my birth process cards which are also available digitally for you to print your own.

exploring physiological birth with the childbirth timeline banner

To explore and add comfort measures along the line

Explore different options of medical/pharmaceutical and non-medical comfort measures. While exploring the options, pros and cons you could add when each of the options might be offered or commonly used. i.e. “When is too early or late for an epidural?” I like to use little props like the duck for “water or birthing pool” along with my “Pain Management – Sort it Out!” activity (digital product to print your own).

how to use labour timeline banner
Labour timeline banner – exploring comfort measures

To explore induction and augmentation options

Similar to the comfort measures, the timeline is an excellent tool to explore which methods of induction and augmentation of labour are available locally and when along the timeline they may be offered. I like to use my induction discussion prompt cards and some props for that!

exploring options and timeline of augmentation and induction of labour using the labour/childbirth timeline banner

To explore the role of the birth partner along the timeline

Exploring the role of the birth partner as one of the guardians of oxytocin is an important part of many antenatal classes. Perinatal educators can use the childbirth timeline banner to help birth partners to explore their role, when they might be doing what. I like to hand out little sticky notes and a pen to everyone and then ask them to write down or draw what they might be doing when.

To explore your birth place and birth environment options along the timeline

Usually, while birth partners are exploring their role, I ask the birthing mothers/parents to explore their birth place and birth environment. I give them some questions to think about. i.e. Whereabouts will you be during early labour, established labour etc. How can you make your birthing space the most comfortable for you? Who is going to be there with you? This can then lead nicely to what they might wish to pack in their birth bag and where they might wish to give birth (home, hospital, midwife-led unit) and to think about their birth plan or preferences.

To explore how you might be feeling along the timeline

Exploring the feelings during childbirth. How might the birthing mother/parent be feeling? How does the birth partner feel? And how might the baby feel at that moment? I like to split the group into three smaller groups at that stage. Along with a different coloured set of sticky notes for each group. One colour each for baby, birthing parent and birth partner. Write down or draw faces of how they might be feeling, stick them to the banner along the timeline.

To explore helpful positions along the timeline

I use my positions for childbirth cards and ask parents to place them along the timeline.

positions for childbirth - along
positions for childbirth cards used along the labour/childbirth timeline banner

To explore hypnobirthing techniques along the timeline

I simply ask expectant parents: “Which hypnobirthing technique or track is most helpful when?” They each get a card or piece of paper with a technique or they get a copy of a script. I then ask them “When would you use that?” each person/couple/family places their item along the timeline one at a time.

To explore breathing techniques along the timeline

Similar to most of the other ideas above, I have some printed out cards and ask parents-to-be to place them along the labour/childbirth timeline banner. Exploring which breathing techniques they may find helpful at different stages of their birthing journey.

To explore massage techniques along the timeline

Again, very similar as above my clients will also explore different massage techniques during my workshops. We will try them out together and explore which ones may be most helpful or comfortable for them during labour. Pictured here are my massage technique cards these are also available as a digital download as well as a set of worksheets (digital download).

childbirth timeline banner massage techniques
exploring massage techniques for childbirth

Exploring the golden hour of childbirth

Finally, when exploring the third stage of labour (birth of the placenta) we also explore the golden hour, skin-to-skin etc including why this is helpful for the birth of the placenta, bonding with your baby, initiating breastfeeding and much more. For this exercise I use my placenta photo set (where appropriate and agreed with the group) as well as some of my newborn appearance card set (also available as digital download) pictures of skin-to-skin etc.

placenta third stage of labour newborn appearance photo cards
exploring the golden hour of childbirth

To create a labour/childbirth beadline, please join me for a labour beadline workshop or do my self-paced online course!
Posted on Leave a comment

Halloween craft activities for your newborn!

Halloween craft activities for you with your newborn! Since your newborn baby is probably a bit young for trick and treat here are some craft ideas instead!

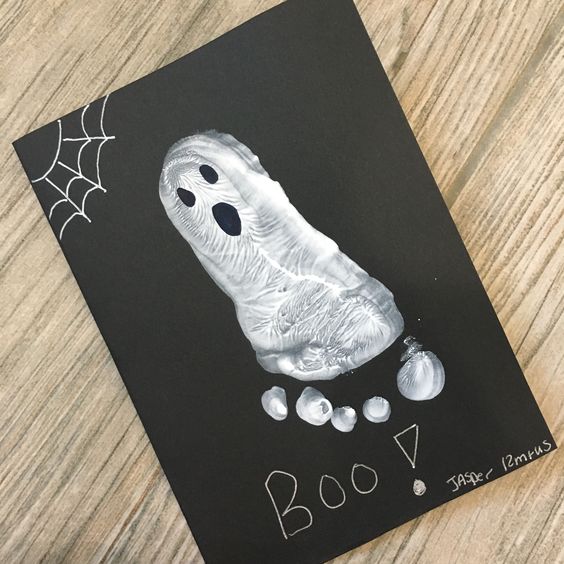
Ghost baby footprint

Halloween crafts for/with your newborn baby

Use hand and/or footprints for Halloween crafts. This will not only provide some great fun and decoration for your home, but also become a great keepsake! You could create the same image every year to see how much your little-ones hands and feet have grown.

Top tips for hand and footprints with babies:

  • If you baby is old enough to safely sit in a highchair, have them sit in a highchair to get safe and less messy access to their feet
  • If your baby is too young to be able to sit in a highchair, either do their footprints when they are asleep or have a friend or family member helping.
  • Use water based paints and check the lable to see if they’ll wash out or might stain
  • It is easier to get a successful handprint from your baby when they are a little older. Newborn babies tend to have the hands tightly closed into a fist a lot of the time. Best bet of newborn handprints is when they are fast asleep!

Here are some images of Halloween craft activities for your newborn:

I have created a pinterest board with some more hand and footprint halloween ideas for you and your baby!

Happy Halloween!

Share your pictures with me in the comments!

Posted on Leave a comment

Birth Partner Do’s and Don’ts

Birth Partner do's and don'ts

You are going to be a birth partner? Here are some Birth Partner Do’s and Don’ts! Well do’s really. You’ll get the don’ts from looking at them!

To be a supportive, confident and well-informed birth partner try the following:

  • Attending childbirth preparation classes with your partner will help with your understanding of what is going on and what she is talking about. There is also some new vocabulary you may wish to learn.
  • Be available by phone, especially closer to the due date.
  • Have your own hospital or homebirth bag including: change of clothes, swimming trunks to wear in the birthing pool, your own drinks and snacks (please don’t drink/eat hers!) and maybe some comfortable shoes or slippers.
  • Make sure you know how to fit the car seat and keep it in the car.
  • Be familiar with the route to the hospital or birth unit and that your car is filled up with petrol regularly.
  • Make sure you know where her maternity notes are.
  • Discuss who to tell and when to tell them that your baby was born. Make a list of contact details.
  • Make sure your camera is charged and the memory card is empty or a new film is in it – maybe have it ready in your bag!
  • Support your partner where you can and try to take over some tasks like shopping, cooking, laundry, cleaning to give her some time to rest before and after the birth of you baby.
  • Make sure that you know and understand your partner’s wishes in her birth plan and add your wishes, too. Or even better: write the birth plan together!
  • If this is not your first baby or you have pets, make sure you know who will look after the older one(s) / pets and how to contact them.
  • If it is not your first baby, wherever you can, take over looking after / entertaining the older one(s) to give mum a break before and after the birth.
  • To practice for labour and birth offer a massage and / or slow dance twice a week before the birth of your baby.  Use these techniques during labour to make your partner more comfortable.
  • Practice some affirmations with your partner. You can download free affirmations here and there are some examples below! Alternatively, you can purchase and download some mp3s here.

I hope you find these ideas useful. If you have already been a birth partner, share with us what worked for you and your partner. We’d love to know!

My Birth Preparation Course (online) is for Birth Partners, too!

Please also check out my online course! No videos, just text and images to learn in your own time. Includes hypnobirthing mp3s, scripts, workbook, handouts, infographics and much more! Lots and lots of information at your fingertips! Includes:

  • hypnobirthing mp3s
  • hypnobirthing scripts
  • written information
  • infographics and other imagery
  • printable handouts
  • printable workbook/journal
Posted on Leave a comment

Bottle-feeding for breast-fed babies

love cute kids baby

Bottle-feeding for breast-fed babies

How to get my breast-fed baby to take a bottle?

To be perfectly honest, just like many things when it comes to birthing your baby and raising your children, it is a lot of trial and error. There is no one-fix or quick-fix solution. Every baby and baby-parent relationship are unique. Your journey is unique.

The following suggestions on how to introduce bottle-feeding to your breast-fed baby, come from years of experience of working with new parents.

When to start introducing a bottle to my breast-fed baby?

Depending on why you are planning on introducing a bottle and whether you wish to continue to breast-feed or mixed-feed, timing is up to you. Some parents have to stop breastfeeding before they wanted to due to medical reasons, or because they are going to be away from their baby. Others choose to stop completely or to start mixed-feeding as their personal preference. Anything is possible. There is no one best time to start as again, you, your family and circumstances are unique.

How to start introducing a bottle to my breast-fed baby?

  • Choose a day when your partner or primary support person will be available
    • Your baby may accept a bottle more easily from someone other than you / the breastfeeding mother or person. They know their milk comes from you and may not understand why it is now offered from this new object (the bottle).
  • Choose a time when your baby is settled and patient.
    • An settled baby is usually more receptive of changes and new things
  • Offer the bottle about 1 hour after a breastfeed at first. Start with a small amount of breastmilk or formula milk such as 1/2 ounce.
  • Offer the milk at the “right” temperature.
    • Breastfed babies are used to drinking their milk at a body temperature of approximately 37 degrees Celsius. They can be a little more particular about the milk temperature. Warm up refrigerated milk in a bowl of warm water, in a bottle warmer or under warm running water. Cool down freshly prepared formula milk in a bowl of cold water or under cold running water.
  • Leave the room/house
    • Sometimes it may be necessary for the breastfeeding mother or parent to leave the room or even the house, so that your baby cannot smell your milk.
  • Be patient
    • Tickle your babies upper lip with the bottle teat, letting your baby “latch on” to it like they would to your breast. If they get upset and haven’t eaten anything after 10 minutes, stop and try again later or the next day. Responsive bottle-feeding or paced bottle-feeding
  • Bond with your baby
    • Talk to them, look them in the eyes. Skin-to-skin when introducing a bottle can help, too. Skin-to-skin contact helps your baby to relax and settle, while it’s stimulating their digestion and interest in feeding.
  • The teat and bottle
    • try different teats and bottles. You may be lucky that the first one you try works for you and your baby but if it isn’t there are many more…
      • short round teats with a wide base are believed to be the encourage a similar experience and movements to breastfeeding.
      • some babies gag on longer teats, therefore, shorter teats seem preferable.
      • warm the teat with warm water before feeding
  • Positions
    • Try different positions. Preferred positions for breastfeeding are often different than those preferred for bottle-feeding. Maybe try a facing out position, so your baby can look around the room. Sometimes walking around the room while feeding can help, too.
  • Try feeding from a spoon, sippy cup, doidycup or small open cup
    • If you don’t wish to use a bottle or you’ve tried everything and it hasn’t worked out for you and your baby, you may try feeding the baby with a spoon, sippy cup, doidycup (baby/toddler training cup) or small open cup. Hold the baby in your lap in an upright, supported position. Bring the spoon or cup to the baby’s mouth and allow the baby to take the milk herself by just touching the milk in the spoon or cup to the baby’s upper lip. Let the baby set the pace. Be very careful to not dump the milk into the baby’s mouth to avoid choking.

Responsive bottle-feeding or paced bottle-feeding

For any parent who chooses to feed their baby with a bottle, responsive or paced bottle-feeding is the current recommendation by the NHS (at the time of writing this in 2022).

Recognize feeding cues. Feed your baby when they are showing signs of hunger.
Hold baby close, in a semi-upright position during feeds.
Tickle your baby’s nose with the teat to encourage them to open their mouth wide. Keep the bottle in a horizontal position.
Watch your baby and follow the cues for when they need a break.
Your baby will know how much milk they need. Follow their lead.
Responsive Bottle-feeding or paced bottle-feeding
Responsive Bottle-feeding or paced bottle-feeding – a visual guide

Here is a video on paced bottle feeding:

Sources, References and Further Reading

DiSantis KI, Hodges EA, Johnson SL, Fisher JO. (2011) The role of responsive feeding in overweight during infancy and toddlerhood: a systematic review. International Journal of Obesity. 35:480-492.

https://www.nature.com/articles/ijo20113

First Steps Nutrition Trust

https://www.firststepsnutrition.org/parents-carers

https://www.firststepsnutrition.org/infant-milks-overview

Posted on Leave a comment

Icebreakers for antenatal classes

Icebreakers for antenatal classes. Break the ice, bond the group. Create lifelong friendships!

Facilitating successful group antenatal and parenting classes in a group setting requires icebreakers. Icebreakers help the participants to engage in the content, get to know the facilitator and other participants as well as building a bond as a group.

I’d start off with an icebreaker which goes round the room/group fairly early on as research shows that once everyone has said one thing in the group early on they are more likely to ask questions and join in later on.

Icebreakers can be really simple, like asking a question to the group and ask each participant [to state their name] to give their response to the question/statement.

Some ideas for icebreakers/questions (choose one per activity/session/round only) for your antenatal classes:

  • One thing I already know about my/our baby…
  • My biggest question about becoming a parent/family/mother/father is…
  • As a new parent I look forward to…
  • My greatest fear about being a parent is…
  • As a new parent I do not look forward to…
  • One quality I would like my child to have is…
  • One thing I have done/changed because of having a baby is…
  • As a new parent I hope I can…
  • One thing I would like to achieve during my/our baby’s first week at home is…
  • Becoming a family/father/mother/parent means to me…
  • One person, I would like my/our baby to meet is…
  • When I need support, I can turn to…
  • One thing I’ll gain as a new parent is…
  • One thing I’ll lose as a new parent is…
  • My/our baby will sleep in…
  • When I hear the word ‘breastfeeding’ it makes me think…
  • If I had an extra hour a day when everyone still has 24hrs a day, I will do… in my extra hour.
  • When I see a mother/parent/father/person breastfeeding I feel/think…
  • When I see a mother/parent/father/person bottle feeding I feel/think…
  • When I need advice I’ll ask/go to…
  • When I think about parental leave, I feel…
  • When I think about returning to work, I feel…

Allow each participant to give their response without commenting on it. These types of icebreaker questions can be used to encourage dialogue and interest in topics that you may not have covered during the course but can also aid revision and group bonding. You can download the questions/statements above as a printable A4 sheet here.

FREE DOWNLOAD

Other ideas are

  • Goodie bag activity – have a goodie bag full of items (one item per participant or couple) i.e. birth bag items, nappy bag items, post-partum recovery items. Ask each participant/couple to pick one [random] item. When everyone has one item, go round and ask the ‘owner’ to comment on the item. What might it be used for? What is it?…
  • People bingo – each participant has a “People Bingo” Card and has to go round and talk to other participants to find people matching the statement. Statements could be: Has a red car. Doesn’t drink tea. Is left-handed…
  • Scavenger hunt – when facilitating online, I often use a scavenger hunt. I put a list of items on the screen, usually related to a topic such as the birth bag and ask participants to find as many of the listed items as they can. This activity usually creates lots of laughter and gets people moving instead of sitting in front of a screen!
  • Physical skills demo – ask each participant/couple to demonstrate a breathing techniqueposition for childbirth or a massage technique and encourage the others to join in.

Find some more icebreaker activities for your antenatal and parenting classes, including the very popular “nice to meet you” people bingo, in my shop! I have also got a fully editable PowerPoint slide set for antenatal education and one for infant feeding education available from my shop.


Sources and Further reading

  • Chlup, D. T., & Collins, T. E. (2010). Breaking the Ice: Using Ice-breakers and Re-energizers with Adult Learners. Adult Learning, 21(3–4), 34–39. https://doi.org/10.1177/104515951002100305
  • S. Gillet, K. Winkle, G. Belgiovine and I. Leite, “Ice-Breakers, Turn-Takers and Fun-Makers: Exploring Robots for Groups with Teenagers,” 2022 31st IEEE International Conference on Robot and Human Interactive Communication (RO-MAN), Napoli, Italy, 2022, pp. 1474-1481, doi: 10.1109/RO-MAN53752.2022.9900644.
  • Pearce Eiluned,Launay Jacques and Dunbar Robin I. M. 2015 The ice-breaker effect: singing mediates fast social bonding R. Soc. Open sci.2150221150221 http://doi.org/10.1098/rsos.1

Posted on Leave a comment

Recovery after Caesarean Birth

You are planning or have had a Caesarean birth? What to expect for your recovery after Caesarean Birth.

Emotionally
How you will feel after a caesarean birth depends on what your expectations on the birth of your baby were as well as on what happened before and during the birth.

The caesarean rate in England is close to 25% (Birth Choice UK, 2011), therefore there is always a chance you may have a caesarean birth. You may feel happy that your baby is finally born but you may feel disappointed that you had a caesarean birth if a vaginal birth is what you were hoping for. If possible, prior to giving birth, try to accept all possibilities for your birth. Births very rarely go exactly as you plan them. Attending an antenatal course will help you to find out more about different options help to prepare you for possible birth outcomes.

Talking over your caesarean birth with a health professional, soon after may help your emotional recovery. You should get a chance to talk to your midwife or obstetrician before you leave the hospital.

If you do not get the chance to talk to any health professional prior to leaving the hospital arrange an appointment as soon as possible. You may then be able to discuss how the caesarean may affect future pregnancies.

Physically
The physical recovery after caesarean birth usually takes about 6 weeks. You will not be insured  to drive a car for 6 weeks after your caesarean. However, if you do feel ready to drive, talk to your insurance company, they may insure you if your GP has signed you off. A caesarean is a major operation and you will experience some pain and discomfort. Even when laughing, coughing or other small movements will make your scar hurt. Supporting your wound with your hands or a pillow will help.

Tips to aid your recovery and ease discomfort

  • Drink plenty and eat and drink as soon as you feel hungry or thirsty. Eat foods that are high on fibre to help prevent constipation.
  • Keep your wound clean by washing and drying it daily. You can use a freshly washed flannel to clean your wound. If you do use soap make sure you rinse the wound thoroughly. To dry, pad rather than rub the wound with a clean towel. Change your towel and flannel daily.
  • Go to the loo hourly to reduce pressure from your bladder on scar.
  • Wear loose clothes and soft cotton underwear. Your knickers should be one or two sizes bigger or wear a pair of your partner’s  There are special knickers which fit over your scar.
  • Tell your midwife if you notice any signs of infection of the scar, e.g. redness, extra soreness or discharge. Also tell your midwife if you are having a temperature.

You will be encouraged to start exercising gently the day after your operation to help speed up your recovery. You may be able to see a physiotherapist but should at least be given a leaflet by your midwife. Take it slowly and do not start any more strenuous exercise until at least 10 weeks after the operation.

Pain relief
There will be pain relief available in hospital and your doctor will give you something to take at home, too. Depending on how much pain you are in, the options may vary. Most pain killers are safe to take when breastfeeding. Please discuss your options with your midwife, obstetrician or other health professional.

Scar – if you would like to know what your scar will / should look like please visit the Caesarean Birth and VBAC Information. In the menu on the left hand side there is a link to Caesarean scar pictures. Caesarean Birth and VBAC Information has a wealth of information on Caesarean Birth, recovery as well as VBAC (vaginal birth after caesarean).

Breastfeeding
You can start breastfeeding straight after the caesarean. Additional skin-to-skin as well as extra support may help. Because of the wound, breastfeeding can be more challenging during the early days. Please ask for help when needed. Most pain relief is safe to use when breastfeeding. Please mention that you are breastfeeding to your health professional.

Future pregnancies
If you have your baby by Caesarean it does not necessarily mean that you will have to have your subsequent babies by Caesarean. You can discuss future pregnancies with your GP and  whether or not you will have another Caesarean will depend on

  • risks and benefits of caesarean for you and your baby
  • your personal preferences and priorities

However, if the reason for your first caesarean was a condition that will not change for future pregnancies e.g. shape of your pelvis / birth canal, it is very likely that a caesarean will be necessary for all births.

Online course including Caesarean Info

Please also check out my online course! No videos, just text and images to learn in your own time. Includes hypnobirthing mp3s, scripts, workbook, handouts, infographics and much more! Lots and lots of information at your fingertips! Includes:

  • hypnobirthing mp3s
  • hypnobirthing scripts
  • written information
  • infographics and other imagery
  • printable handouts
  • printable workbook/journal

Further information

Posted on Leave a comment

8 tips for self-care in pregnancy

8 tips for self-care in pregnancy, why is that a thing?

During your pregnancy, many expectant parents will focus on what is best for their baby. One of the most important parts of doing the right thing for your baby should be taking care of yourself. While there are a lot of things to prepare before your baby comes, you need to focus on your physical and mental health. These tips for pregnancy self-care may help you prioritize your health and wellness for the benefit of you and your baby and your immediate family.

Not sure where to start? Here are my 8 tips for self-care in pregnancy:

  1. Keep a diary or do some journaling
    • Many people find creativity relaxing and soothing for their minds. Why not try some journaling? Here are some free affirmations that can get you started!
  2. Enjoy some bonding time
    • Bond with your baby while you are listening to your hypnosis tracks, mediate or just sit and relax. Stroke your belly and tune into your little one! A great way to do this is to listen to my “Bonding with your baby” track!
  3. Have a bath or shower or go for a swim
    • Being in water can help you feel weightless again! Many pregnant parents love the way it feels to be floating in a swimming pool! Alternatively, have a relaxing bath while listening to some music or reading a book!
  4. Try a pregnancy massage
    • If you are a fan of massages, a pregnancy massage is an awesome way to practice some self-care. Have a look for some local massage therapists who offer pregnancy massages. Local to me (I am in Nottinghamshire, UK) there is the amazing Emily offering her pregnancy massages at The Parlour.
  5. Enjoy early nights
    • Growing a baby is exhausting! Enjoy some early nights!
  6. Eat well
    • Check with your healthcare provider which foods are recommended and not during pregnancy. The recommendations vary from time to time and country to country. So, it’s best to check with your local and current recommendations.
  7. Enjoy some (long) walks in the fresh air
    • Enjoy some (long) walks and bathe in nature. Nature bathing might sound like an alien concept but most people will have done it before. Nature bathing is taken from the Japanese concept of forest bathing. It means that you are outside and mindfully enjoy and experience nature. Turn off your phone, clear your mind and stroll through your local country side. Lots of studies shoe that this is good for mental wellbeing.
  8. Talk to a friend or family member
    • We all know that talking to a loved-one can really boost our wellbeing. So, phone a friend or meet them for a cuppa and a chat!

What do you do to relax? Share your ideas with me and other expectant parents!

Now is the time to enroll in your online birth preparation course!

Please also check out my online course! No videos, just text and images to learn in your own time. Includes hypnobirthing mp3s, scripts, workbook, handouts, infographics and much more! Lots and lots of information at your fingertips! Includes:

  • hypnobirthing mp3s
  • hypnobirthing scripts
  • written information
  • infographics and other imagery
  • printable handouts
  • printable workbook/journal
Posted on Leave a comment

Clothes checklist for your winter baby

Clothes checklist for your winter baby. You are having a baby this winter? Congratulations! You are wondering how many and what types of clothes and layering you might need?

When purchasing your baby clothes, make certain that they all are machine washable, non-flammable and made from soft comfortable materials. Choose clothes which open at the front or have wide/enveloped neck openings.

The layette checklist below should be taken as a minimum and guide only. A winter baby will need a few more items compared to a summer baby. You may wish to have a few more spares of each item if you can afford to purchase more.

Clothes checklist for your winter baby

  • 4 body suits/sleepsuits/babygrows
  • 4 vests (check for a wide neck opening) – you may wish to choose long-sleeved ones
  • 4 cardigans or jackets
  • 1 hat
  • 2 pairs of socks
  • 2 pairs of mittens (many babygrows now have integrated mittens, so you may not need to purchase any).
  • 1 baby blanket
  • 1 baby snowsuit/pramsuit (optional)
  • 1 baby sleeping bag (optional)

In addition to the layette (set of clothing) your baby will also need nappies (either reusable or single-use) and you’ll want to make sure you have plenty of muslin squares! These are very handy to protect your clothing, mop up sick or clean up other bits and bobs. Muslin squares are also very handy to have as emergency nappy or breast pads 😉

I have created two handouts for you. One is a layering clothing guide and the other one is your winter baby clothes checklist!

how many layers sh
How many layers should my baby wear at night? Click the image to download your pdf handout.
Clothes checklist for your winter baby. Click on image to download your pdf handout.