What is ⚡️Lightning crotch⚡️ or 🗡️ fanny daggers 🗡️ and how can I avoid them? Here are 3 tips to avoid Lighting Crotch.
Have you ever had a sensation during your pregnancy that feels like someone stabbing you into your vulva/vagina? This is called a lightning crotch.
Your pubic symphysis or pubic bone is located where your two pelvic bones meet. That’s number 3 in the image below:
This is where the stabbing sensation is happening. It is aggravated by simple movements including walking, single leg standing, rolling over in bed and getting out of your car.
3 tips to avoid Lighting Crotch
✅ Sit down to put on your trousers or leggins.
✅ Keep your legs together ehen rolling over in bed.
✅ Swing both your legs round, then stand up when getting out of your car.
To find out more about pregnancy and childbirth comfort measures and top tips, join one of my antenatal classes or my online course! Evidence-based information, top tips, hacks, real-life stories and much more!
Newsletter for expectant and new parents
Online Birth Preparation Course only £35!
Please also check out my online course! No videos, just text and images to learn in your own time. Includes hypnobirthing mp3s, scripts, workbook, handouts, infographics and much more! Lots and lots of information at your fingertips! Includes:
This weeks marks safer sleep week, so I am writing about teaching about safer sleep for your newborn babies.
I know thatgreater awareness of safer sleep leads to a decrease in the numbers of babies dying.
Sadly around 3 babies a week still die from sudden infant death Syndrome (SIDS) in the UK (Lullaby Trust). If all parents were aware of safer sleep advice and practises we could save many lives. For most up-to-date research and recommendations, I point parents towards the Lullaby Trust or BASIS.
How to integrate teaching about safer sleep into your class?
Many parents are worried and/or unsure about clothing layers and safer sleep. I usually start off with my “dressing your baby” activity. Each parent/family unit has a baby doll or made their own towel baby. Then I have either a variety of baby clothing and accessories spread out on a table or floor in the middle of the room or, when social distancing was required, I had individual washbags for each family unit with
baby grow
long sleeve vest
short sleeve vests
scratch mittens
hat
socks/booties
cardigan
blanket
Then, each family unit receives a random weather/temperature scenario card. Each family is then to discuss the scenario, choose an appropriate outfit and dress their doll in it. Once finished, each family would present their choices and share what they chose how they decided on the outfit. This usually leads into a discussion about layers and overheating and how you can tell your baby is not too cold/hot. I hand out this clothing layers guide.
Then we discuss sleeping arrangements and what may be a practical choice for them by looking at my size comparison chart.
After that we look at the safer sleep recommendations by the lullaby trust and put our babies safely to bed (I usually use a piece of flipchart paper to represent the cot mattress). If I have the equipment in at the venue I show this video before they put their baby doll to bed:
If I don’t have the equipment I ask them if they could download and look at the BASIS App before the session and watch the video above.
Alternative safer sleep teaching ideas
Alternatively, I have used the “make a room” and “spot the risk” by the lullaby trust (free) before. However, I have stopped using these as I am focussing on reinforcing truths and positive practise. Therefore, I have removed images containing less safe, unsafe or dangerous content. This approach comes from my hypnobirthing practice as well as my early years work with “Empowering Parents, Empowering Communities” (EPEC). I have also updated all the “true” and “false” quizzes I use to only contain true information/statements, to reinforce these.
Teaching about safer sleep online
In an online setting I am using my “dressing your baby” powerpoint for online learning. I have each family in their private zoom room (breakout room) and using google slides, each of them has access to their own slide. i.e. breakout room #1 works on slide #1 etc. Each slide has a different scenario as a background and clients can move the clothes around.
For the other tasks as above, I ask them to bring along a selection of baby clothes if they have any or just describe to us how and where their baby would sleep most safely…
Onset of labour – Activities for Childbirth Education Classes. Some ideas for antenatal teachers, midwives, doulas and other birth workers.
I think it is safe to say that almost every expectant parent is thinking about the onset of labour.
How do we know?
When do we go to the hospital?
When do we call the midwife?
When do we call our partner?
What does it feel like?
During my years as an antenatal teacher, doula & facilitator, I have observed many other practitioners, attended antenatal classes when I was pregnant, read books and blogs. I have adapted and developed a number of different activities to cover the onset of labour in group as well as one-to-one sessions.
When I started my journey as an antenatal teacher, I used an activity by Mary Nolan to explore the onset of labour. From her book Antenatal Education: A dynamic approach.
In this activity, each group / couple has a set of cards with ‘symptoms’ on them such as ’41 weeks pregnant’, ‘strong regular contractions’, ‘lower back pain’, ‘waters break with a gush’, ‘mild irregular contractions’, etc… Each group is asked to shuffle their cards, then holding them face down and revealing one ‘symptom’ at a time. Lining the symptoms up, coming towards them. Each group has to decide “we are in labour” and to stop turning over cards. While this activity sounds great and works well in tutorials with fellow future Antenatal Educators, I found that couples struggled to follow the concept and were mostly sorting the cards by ‘labour’ ‘not labour’ instead… I have called the activity “Call the midwife?!?) and you can download it for free when you sign up for my newsletter (see sign up form below). This might have to do with my ability (or lack of) to explain the activity, who knows? This and many other labour and birth related activities are included in my ‘Labour & Birth Bundle’.
For my own sessions 1:1 and group, I now use a labour timeline approach. I mostly use both, my labour timeline banner and a labour beadline. After discussing possible signs of labour and warning signs in a brainstorm activity (depending on group size; possibly in 2 groups) We discuss in big group. I reveal the labour timeline bit by bit afterwards.
Labour Timeline Banners
Labour Beadline
Focus: onset of labour. The participants are asked (in small groups if I am working with a group) to come up with
who to contact / how can we be ready / what do we need to remember to take with us?
Comfort measures
what happens (in the woman’s body)? where are we? where are we going?
This usually gives pregnant women and their partners a very good opportunity to think about having enough petrol in the car, do we both know where the notes are?, is the birth bag ready, do we have a plan B for transport (just in case)… Leading on to how ‘being ready’ having ‘a plan B’ can aid onset of labour as well as progress, bringing it back to hormones…. My hormones of labour and birth posters are hanging on a wall / table during the activity.
Your birth trauma is real. Sadly, we live in a country (UK) where the maternity system is broken. Induction, Caesarean birth and assisted birth rates are rising, and so is the number of parents who are experiencing birth trauma.
What is Birth Trauma or postnatal PTSD?
There are four main symptoms:
Avoiding anything or anyone that reminds you of the trauma. This could be avoiding other parents with babies, or going to or driving/walking past the place you gave birth.
Re-experiencing the traumatic event through nightmares, flashbacks or intrusive memories which make you feel panicky or distressed.
Feeling hypervigilant which means that you are constantly alert, jumpy and irritable. You are worried that something bad may happen to your baby.
Feeling low and unhappy. Or maybe feeling guilty and blame yourself for your traumatic birth experience. You may also have difficulty remembering parts of your birth experience.
Not everyone who has had a traumatic experience suffers from PTSD. Whenever we experiencing a trauma, PTSD is a common response. It is involuntary, you cannot help it. It cannot be cured by “snapping out of it” or “focusing on the positive”.
Maybe you are reading this because your birth trauma is preventing you (and/or your partner) from trying for another baby? Or are you reading this because some people tell you to “snap out of it”? Or maybe, you cannot sleep or feel you cannot love your baby because of your traumatic birth experience?
You are not alone! Your birth trauma is real. Research shows that about 4-5% of women/parents who give birth develop PTSD. Fathers and partners can develop PTSD as a result of witnessing a traumatic birth, too.
How can you help yourself and others to overcome birth trauma?
Have a look at the Birth Trauma Association (BTA) there are many examples on where and how to get help, including their support group or getting psychological help. Talk to professionals such as
Chat to other women on the web boards used by BTA members
There may be families in your area who have experienced birth trauma, too and are happy to talk to you about your and their experience. The BTA has a forum where you can ask for local volunteers or peers.
Another wonderfully supportive option is Sheryl aka The Healing Birth Doula. If you are lucky enough to be local to her, then you can access her in-person support and learning. However, she also offers online learning including an online course.
Pregnant again after birth trauma?
If you are here because you are pregnant again after experiencing birth trauma, here are some suggestions on how to help you enjoy your pregnancy and start to look forward to the birth of your baby.
Although there is no “quick fix” for you there are plenty of options. It is important that you talk to someone. Maybe a doula or hypnobirthing practitioner would be the most helpful. They can work with you on what happened during your previous birth, help you get closure to be then ready to move on and plan this new birth experience.
To access a practitioners who is trained in the 3-step-rewind technique can also help you heal.
acknowledge this is a completely new baby and new experience
start writing down your birth preferences and what if ideas
start to look forward to your new birth experience
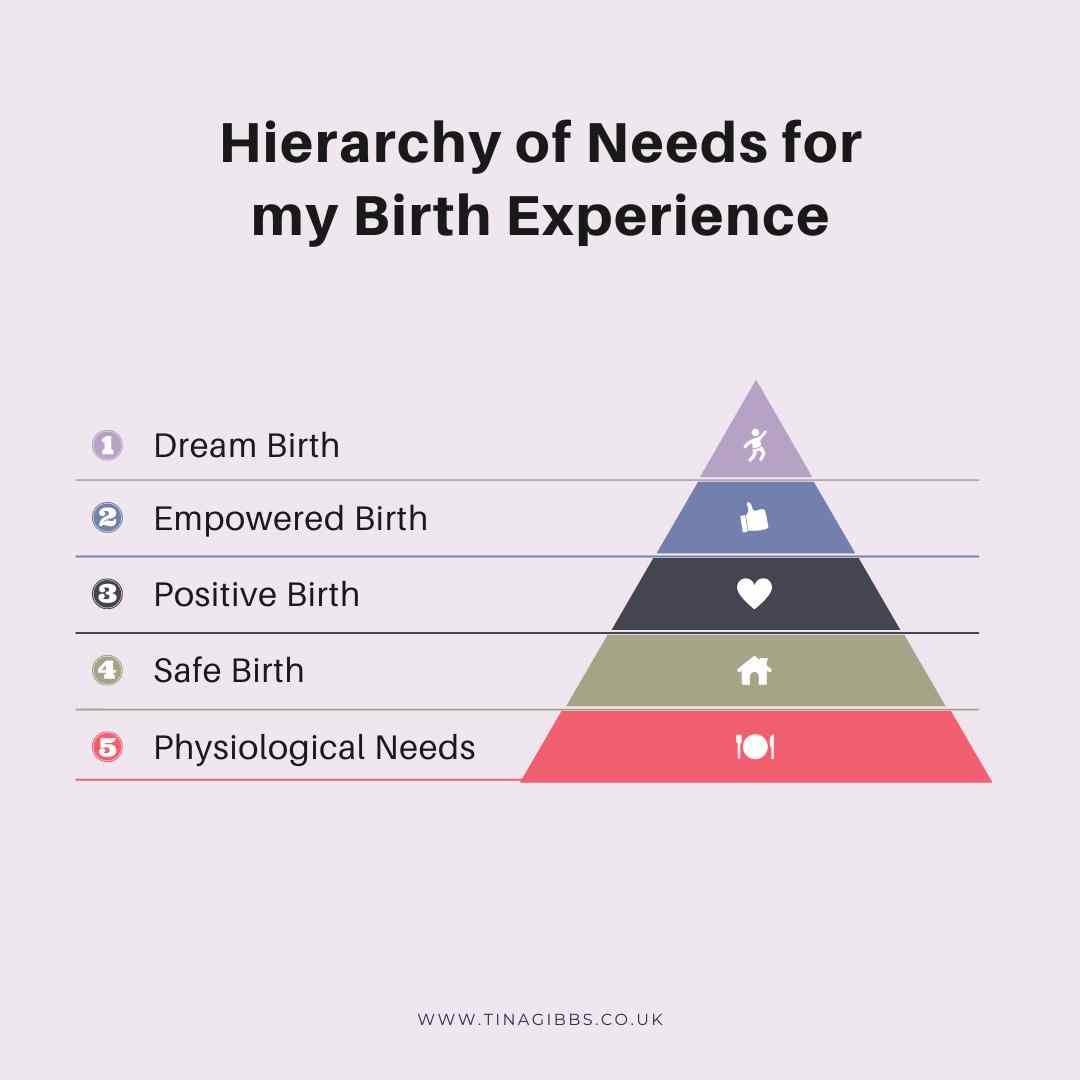
Your steps towards an empowered or dream birth experience are shown in the image below.
My online course to help you prepare for the birth of your baby!
Please also check out my online course! No videos, just text and images to learn in your own time. Includes hypnobirthing mp3s, scripts, workbook, handouts, infographics and much more! Lots and lots of information at your fingertips! Includes:
Induction for a big baby and what has a hamster got to do with birth?
If you have listened to @themidwivescauldron back in November 2021 or follow Dr Sara Wickham, you probably know already. The Cochrane review on macrosomia (big baby) in 2016 showed that the difference in birth weight between the two groups: 1. Induced early 2. The spontaneous onset of labour/birth was 178g. The difference is equivalent to the size of a hamster 🐹 or a medium-sized pear 🍐 (see Sara Wickham’s book ‘In your own time’ for more!). This should make your ‘big’ baby seem less big and scary.
However, it is your body, your baby your choice! If you fell that an induction or caesarean birth is right choice for you then that is what you should choose. Your doula or perinatal educator will support you all the way to make the right decision for you and your baby and as well supporting your choices! However, chances are you are reading this because you feel and that an induction of labour (or Caesarean birth) for a big baby is not what you want.
How can you decide whether to have an induction for a big baby or not?
The aim of the induction for big baby is to reduce the chance of ‘baby getting stuck’ (shoulder dystocia). In the majority of cases, shoulder dystocia does not result in any long term issues. Here is a printable version of the Cochrane – Pregnancy and Childbirth where you can have a look at their findings to help you make the right choice for you and your baby!
What are the reasons for declining and induction for a big baby?
If the size of your baby was the only reason, then you may wish to decline the induction of labour.
Reason #1 for the recommendation of induction is the assumption that big babies are at higher risk for getting stuck (shoulder dystocia). In reality, 7-15% of big babies have difficulty with the birth of their shoulders, most of these cases are handled by your midwife or obstetrician without any harmful consequences for your baby. Statistically In 1 out of every 555 babies who weigh between 8 lbs., 13 oz. and 9 lbs., 15 oz., and 1 out of every 175 babies who weigh 9 lbs., 15 oz. or greater, permanent nerve injuries due to stuck shoulders happen.
Interestingly, people with high blood sugar levels during pregnancy are at increased risk of shoulder dystocia during childbirth even when their baby is not considered big. This is because their baby’s weight can be distributed differently when their mother/parent has high blood sugars. Problems are more likely to occur if the baby’s head size is relatively small compared to the size of its shoulders and abdomen. (Kamana et al. 2015).
BUT can we really tell how big your baby is?
How accurate are the baby sizing scans or palpation? In short, both, scans and palaption are equally inaccurate/bad at predicting your baby’s size.
For the scan accuracy % check out table 3 in this article (see a copy below). It shows that the accuracy of ultrasound scan at preterm vs. term gestational age, with scan performed within three days before birth preterm (before 37 weeks) or term (37+ weeks).
Proportion of error within
±10%
±15%
±20%
Gestational age at scan:
<37 weeks
69.6
85.6
91.9
≥37 weeks
72.8
89.6
95.9
To find out more and read in more depth about induction for big babies, I recommend:
Please also check out my online course! No videos, just text and images to learn in your own time. Includes hypnobirthing mp3s, scripts, workbook, handouts, infographics and much more! Lots and lots of information at your fingertips! Includes:
Teaching about Physical skills for parents who choose to have an epidural and how to help them to improve their birth experience and overall comfort.
When parents have an epidural, they are limited in their movements. Although they won’t feel their contractions, they can still benefit from massage and breathing techniques. The skin-to-skin contact can help the flow of oxytocin which aids the birthing process. The breathing techniques ensure that parents breathe calmly to optimise their and their baby’s oxygen supply. Their relaxation reduces the risk of their baby to be distressed. Therefore, it is important to include parents who chose to have an epidural for their birth experience in your activities when teaching about physical skills for labour and birth.
When I have clients who choose to have or are likely to have an epidural for their birth, I focus on teaching about hand massage, face/head massage and breathing techniques with them.
Teaching about Physical skills for parents who choose to have an epidural – Ideas
These techniques combined with the use of a peanut ball work wonders for my doula clients! Here are some ideas for you to use in your classes:
Face/Head and Neck massage
Clients can massage their own face/head and neck or they can ask their partner to do it for them. You can follow the image below:
Hand Massage
Hand massages are very popular. The skin-to-skin contact between the birthing person and their partner aids the flow of oxytocin. Ask your clients to give themselves or their partner the following hand massage techniques:
gentle circular movements on the palm and top of the hands as well as the fingers
gently pull on fingers (DO NOT make them pop).
Breathing Techniques
Download my breathing techniques worksheets to use in your classes. They help parents and perinatal educators to practice breathing techniques.
Encourage your clients to practice the breathing techniques as well as your comfortable breathing pattern together with their (birth) partner. When their birth partner is aware of their comfortable breathing pattern/speed, they can help by counting them in/out or by keeping eye contact and breathing at your comfortable speed until they have reached their comfortable pattern again.
Peanut Ball
As you can use a peanut ball on the bed, it becomes an excellent tool for labour and birth with an epidural! Here are some peanut ball position ideas you can encourage your clients to try:
The mother sits in a semi-reclined position with one of her legs over the peanut ball and the other one next to it. The peanut ball needs to be as close as possible/comfortable to mum. If the ball starts sliding about, you can pop a pillow, cushion or rolled-up towel under it to hold it in position. This position promotes dilation of the cervix and descent (moving downwards) of the baby when the baby is in a good position.
Another way to use the peanut ball on a bed is in a side-lying position. While mum is lying on her side the peanut ball can be used to lift up and hold the upper leg in position. The ball can be positioned in a way that either mum’s thigh only is supported or that both, her leg and her ankle are resting on the ball. This position helps to open the pelvic outlet and may also help to rotate a posterior (back to back) baby into a better position for birth.
The mother can also sit on the peanut ball and give birth in that position.
For the second stage of labour with an epidural, remember to use a peanut ball to support a comfortable and supporting birthing position (see section on peanut balls above).
The birthing mother/parent may not exactly where/how to push while using the epidural. This breathing technique can help:
Breathing Technique for the second stage (pushing) of labour with an epidural
Breathing Technique for the second stage (pushing) of labour with an epidural: Ask your clients to make a fist and blow into it (as if they were to inflate a balloon). This breathing technique, makes use of their diaphragm which automatically helps the body to push “in the right place/way”.
You are pregnant! Congratulations. Now is the time to get organised. This pregnancy checklist is a gentle reminder of your options, recommendations and appointments…
What
When
The recommendation is to start taking Folic Acid and Vitamin D supplements
As soon as you found out that you are pregnant
Register with your community midwife. Check with your GP surgery on how to do that.
If you are employed: Inform your employer in writing incl. your Mat-B1 certificate about your maternity leave plans If you are unemployed or self-employed: Find out if you’re eligible for Maternity Allowance
Must be 15 weeks before your due date – Between 22-25 weeks
Please also check out my online course! No videos, just text and images to learn in your own time. Includes hypnobirthing mp3s, scripts, workbook, handouts, infographics and much more! Lots and lots of information at your fingertips! Includes:
How can you use your birth ball for pregnancy, childbirth and during the early postpartum?
What is it?
A birthing ball is the same as an exercise or gym ball. The name “birth or birthing ball” refers to this specific purpose. A birth ball can help rotation while the you are sitting or when standing isn’t an option and a birthing stool isn’t available.
Why should I use one?
Using a birth ball to sit on strengthens your lower back, and improves your posture as your pelvis is better supported. This can help to prevent or ease lower back pain. Sitting upright helps your abdomen be a “hammock” for your baby and encourages them to settle into a more beneficial position for the birth (anterior position). For this to be most effective, start early, best before you get pregnant!
What is the best size for me?
The best size depends on your height. Ideally, your knees should be equal or slightly lower than your hips when you sit on it.
YOUR HEIGHT
BALL SIZE (CENTIMETERS)
up to 163cm
55cm (or inflate 65cm ball to 55-60cm instead)
164 to 173cm
65cm
Above 173cm
75cm
Ensure that you purchase a good quality ball which has a no burst (anti-burst) layer and has been pressure tested to support weights up to 300kg (47st).
What are the benefits of using a birthing ball?
Eases back pain and improves your ability to move around and stay upright.
Offers counter-pressure to your perineum
Gives excellent support when you’re squatting (holding on to it) or sitting on it, leaning over it….
Reduces pressure on your spine
Supports you to remain in an upright position. When upright, gravity increases the efficiency of your baby’s descent – supports a straightforward birth and may reduce the length of time you are in labour
Stimulates blood flow to the pelvic area, which increases blood flow to your uterus and placenta
May improve your baby’s position in utero
Helps open up the pelvic muscles
Can reduce the discomfort from contractions and therefore reduce tension, anxieties and fears
How and when can I use it?
Sit on it with your feet flat on the ground and apart.
During your pregnancy
Use your birth ball instead of a chair when sitting, when working, watching tv etc.
To bring on labour
Sit on your ball and do circular movements with your hips. This can help get your baby’s head into your pelvis and on the cervix. If your baby is back-to-back (posterior) check out Spinning babies for some exercises!
During labour and birth
During early labour, you can continue to sit on your birth ball. It offers great support and gives a good counter pressure to your slightly uncomfortable and possibly swollen vulva. Way more comfortable and supportive than a hospital bed or chair while supporting the birthing process!
You can also
Use it throughout all of your labour and birth to sit on
Lean over your ball during any part of labour while kneeling or standing. Place your ball on the bed or a chair/surface when leaning over it while standing.
Sit and rock on it in gentle circular or side-to-side or back-to-front
Standing, put the ball behind you against a wall. Lean into it and you can use it for a gentle massage
Standing, put the ball in front of you against a wall, and lean into it. You can use it support when rocking and leaning over slightly
Hold on to it for a supported squat
During the early postpartum and forever…
Continue to sit on your birth ball for comfort and support. Your baby, like any new baby, needs to be held. They have been in your womb for 10 months and are used to being squished and squashed, and rocked by your movements and heartbeat. Siting and gently rocking or bouncing on your ball while holding your baby can help you stay comfortable and your baby to calm.
Forever, always, anytime, your birthing ball will be a great place to sit to improve your posture, reduce, prevent or eliminate lower back pain. It’s fun, too!
Download your birth ball and peanut ball handout here.
Please also check out my online course! No videos, just text and images to learn in your own time. Includes hypnobirthing mp3s, scripts, workbook, handouts, infographics and much more! Lots and lots of information at your fingertips! Includes:
Luces Lago AM, Mosquera Pan L, Tizón Bouza E. A pelota de parto. Redescubriendo un recurso no farmacológico de gran importancia en el proceso del parto [The birthing ball: rediscovering a non pharmacological resource of great importance in the birth process]. Rev Enferm. 2014 Mar;37(3):36-42. Spanish. PMID: 24851341. https://pubmed.ncbi.nlm.nih.gov/24851341/
Shen HC, Wang H, Sun B, Jiang LZ, Meng Q. Birthing ball on promoting cervical ripening and its influence on the labor process and the neonatal blood gas index. World J Clin Cases. 2021 Dec 26;9(36):11330-11337. doi: 10.12998/wjcc.v9.i36.11330. PMID: 35071563; PMCID: PMC8717508. https://www.ncbi.nlm.nih.gov/pmc/articles/PMC8717508/
Tussey CM, Botsios E, Gerkin RD, Kelly LA, Gamez J, Mensik J. Reducing Length of Labor and Cesarean Surgery Rate Using a Peanut Ball for Women Laboring With an Epidural. J Perinat Educ. 2015;24(1):16-24. doi: 10.1891/1058-1243.24.1.16. PMID: 26937158; PMCID: PMC4748987. https://www.ncbi.nlm.nih.gov/pmc/articles/PMC4748987/
One of the most frequent questions before clients book my hypnobirthing classes is “Can I use hypnobirthing during an induction?” The answer is YES.
Hypnobirthing or mindful hypnobirthing is an invaluable skill during induction! In my opinion, mindful hypnobirthing techniques during an induction are even more important and useful than when having a straightforward birth experience! Since indcutions are becoming more and more common, more and more parents-to-be are wondering how to best face the change of plans…
Hypnobirthing tool during induction?
Inductions can be difficult because often you are “not ready” or your body and hormone levels aren’t quite there yet. Often, induction involves closer monitoring and potentially less privacy, which can slow down your oxytocin flow. Hypnobirthing can help you and your body to feel more ready to allow your oxytocin to flow more freely.
Oxytocin, the hormone of love, labour and lactation. Giving you contractions during labour. A “shy” hormone that your body releases when you feel relaxed, safe and loved.
Remember! Your hypnobirthing techniques are very versatile. When you are frightened about an induction, fight or flight may kick in, and your body may tense up and work against the induction process. However, if you are accepting of what is happening, use your techniques and work with the process it becomes a lot easier.
It is even more important for you to understand that if you have agreed to an induction, keeping yourself as calm as possible and focused on your breathing is likely to positively impact your and your baby’s well-being. Your decision tools, STARR (in Mindful Hypnobirthing) and BRAINS will help you navigate your informed choices. Educate yourself about your local options. Discuss them with your doula and care provider.
When you have practised your techniques and are mentally prepared to use your hypnobirthing techniques, you are conditioning your body to respond positively to cues in your environment such as music, smells (aromatherapy), touch, (mental) images… Practice is key for it to work! You can prepare by reading a book or more, attending a live class or doing an online course. Choose a practitioner whose voice, accent and tone you like and can easily relax to.
A strong, calm birth partner can make a huge difference in your empowered birth experience. Prep your partner. The better your partner understands how self-hypnosis or mindful hypnobirthing works, the more supportive they can be for you. Think about a doula or a friend or family member, who can support you and your birth partner!
Please also check out my online course! No videos, just text and images to learn in your own time. Includes hypnobirthing mp3s, scripts, workbook, handouts, infographics and much more! Lots and lots of information at your fingertips! Includes:
I can help you prepare for your birth experience. Book your 1:1 birth preparation with me! Available in-person in Nottinghamshire, Lincolnshire and Leicestershire as well as online on zoom.
When you’re used to facilitating your antenatal classes for couples, you might find solo parents attending daunting. So here are 6 ways or ideas on how to include solo parents in your antenatal classes.
Language
Watch your language. Take the solo parent’s lead. How do they introduce themselves to you and the group. Are they calling themselves single parent, sole parent, solo parent…? Mirror that language.
Self massage
It is always a good idea to facilitate and teach about self-massage and self-hypnosis. Here are some self-massage techniques…
Self-massage techniques to include solo parents in antenatal classes
Images
Include images of solo parents to your antenatal classes. Images of a single person in a labour and birth position, a mother or father holding their baby, etc. Check your visual aids to see if they include images of labouring people on their own. My positions for labour and birth poster as well as the cards include images of solo parents.
Storytelling
Include stories about solo parents you know (use their names with their consent only). You could say something like “A solo parent from a previous course found XYZ really helpful.”
Hypnobirthing
Hypnobirthing or self-hypnosis for birth is a very popular choice amongst solo parents. They regular practice of the techniques enables the birthing parent to be “in the zone” and focus on their body and baby.
Mindfulness
Just like hypnobirthing, mindfulness techniques have recently gained popularity especially with solo parents. The focus on the here and now, themselves, their body and their baby works wonders during labour and birth.
Inclusion of solo attendees as standard in your classes
Make the inclusion of solo parents to your antenatal classes something you do every time. Even if everyone in the room has a birthing partner, you never know if the birthing partner can make it to the birth. Explain to expectant parents, that there is like to be a time when the birthing mother/person/parent is on their own at least for a short time.
The information, resources, and materials provided on this website, including all digital and physical products, are for educational and informational purposes only. They are not intended to replace professional medical advice, diagnosis, or treatment.
While every effort is made to ensure that the information and images presented are accurate and up to date, they reflect personal interpretation and understanding. As such, they may not always be complete, precise, or applicable to every individual situation.
Always seek the advice of a qualified healthcare professional regarding any medical concerns or decisions. Do not disregard or delay seeking professional advice based on information found within these materials.